Dreading your next long car trip with your kids? Never fear. I’ve got you covered tip to tail with everything you’ll need for your next journey, including enjoyable anecdotes from my own horrors on the road!
Read moreI Love My Body; I Hate My Body.
Sometimes I wonder what it must be like for men who’ve literally never thought for a second about the food they’re eating. EVERY time I eat something, I’m thinking about it.
Sometimes I’m thinking, “Well this is super unhealthy. But I deserve it. I’m stressed. I’m gonna pack myself full of food and not care a bit.”
Sometimes I’m thinking, “This is super unhealthy. I kind of hate myself for eating it, but I’m too tired to care.”
Sometimes I’m thinking, “This is so healthy! Good for me! I am amazing and basically an Instagram fitness model!”
But I am ALWAYS thinking. There is never a meal or a snack to which I don’t ascribe some sort of value judgment.
This is not to say that I have an unhealthy relationship with food in any kind of catastrophic, life-altering way. It’s simply to say that I am female. And this is what we have been taught to do.
When I was pregnant, I loved so much about the experience, chiefly how delightful it was to bare my big giant belly with PRIDE. A lot of pregnant women I know choose to wear loose, blousy tops or dresses, but not me. HELL no. Every chance I got, I was wearing something snug and form-fitting. It was both a treat and a relief to have a completely socially acceptable reason to be straight up overweight. It was a dream I’d had for years and boy, did it deliver.
On the back end, after Mac was born, things were a little different.
The cute little boobs that I’d always been proud of looked quite different (AKA deflated and sad) after nursing a baby for 11 months. The strong legs that I’d cultivated through months of Pure Barre classes had a solid layer of fat from my hipbones to my ankles. And then there’s the obvious midsection trouble: flabbier, softer, and looser-skinned. My hair fell out and regrew, which means short tendrils sprouted from the corners of my hairline and the nape of my neck and have now grown into inches-long-but-still-not-long-enough chunks of weird hair that has to be tended to specifically or else it sticks out. OUT. Straight out of my head.
It occurred to me during this season of body insecurity that I had never really had any body insecurity before.
I mean, yes. Obviously I’d been self conscious growing up about certain things - my nose is big, the hair on my legs is so black and stipply and even when I’ve just shaved, you can see the little pores where it grows (like if any boy ever touched my legs I was secretly freaking out). But real body insecurity that’s based on being overweight or something I couldn’t control immediately - that was new.
And it kind of rocked how I perceived myself. For the first few months of Mac’s life, I was doing my hair and makeup every day just to counterbalance the weight of my appearance. I didn’t hate myself, but for the first time in my life, I dreaded passing a mirror between the moment I got undressed and the moment I got in the shower.
Now, things have settled a bit more. My legs are mostly back to where they used to be, through the wonder of genetics. I’ve lost the baby weight and am back in my pre-baby clothes. But I still struggle to feel “beautiful” unless certain boxes are checked: my hair is freshly colored, I have self-tanner on my face, I have undereye makeup on, and I’m under 145 pounds.
You can add in your own list of things here that you don’t feel pretty without. We all have them.
Jordan and I are going to Mexico tomorrow, and as I started dreading being in a two piece, I started thinking about how incredible the journey my body has been on actually is.
I’ve grown a baby to term and endured the physiological trauma of labor and a C-section - one of the very few major, non-laparoscopic surgeries that is still routinely performed. I’ve made food for my new baby and gotten it to him for almost a full year. I gained a little over 50 pounds and lost it again. And this is just pregnancy stuff.
I’ve endured two rounds of stitches to the left knee and a gnarly high ankle sprain. Wrist sprain. Busted lip so hard my tooth almost popped through. Pink scar on my left shoulder from a bike wreck in 7th grade. Exercise-induced asthma for the first 10 years of life. Caffeine, alcohol, repeat on countless weekends. No sleep. Stomach bugs. Junk food. No food. Too much food.
Those aren’t traumas by any means, but they’re the things we all put our bodies through. Every day, our bodies serve us in ways that we completely take for granted. This is to say nothing of people who have chronic disease, illness, or pain.
When I sat down to write this post, I couldn’t decide if I wanted it to be a “Who gives a shit about your stretch marks? You’re fabulous!” post, or an “Okay yeah, we can acknowledge our flaws. But life is about more than that!” post. I couldn’t really land on one or the other.
So here’s what I’ll say instead. When I board the plane tomorrow for our vacation, I’ll go through about 11 cycles of, “Okay - don’t look too bad! Way to go, me!” Followed by a spiral of “I really wish I’d worked out more before this vacation,” followed by, “I deserve to eat EVERYTHING AT THIS RESORT AND I PLAN TO, DAMMIT!” Pepper in some “Oh my gosh my, my thighs are sticking to this chair,” and “My legs will never be smooth,” and “Did I remember to shave my underarms this morning??”
But what I’m really hoping for is to quiet my mind and enjoy myself without being my own constant hall monitor of body talk.
Maybe the important thing is to have a check on your thoughts and reign them in occasionally. Body mindfulness, maybe? I’m no authority on this subject, because I struggle with it in some capacity every day, like many women do. I don’t have wisdom to extol.
Except to say, at the risk of being trite, that our bodies are actually pretty incredible. And that if we’re doing things right, maybe we can move past a bit of the obsessive self-talk about food and body image and just live our lives. I guess I do have a point to this post, after all. It’s about presence. We only have one life, so maybe you oughta go live your best one in your shorts or your bathing suit or your tank top or your skin tight dress or your caftan or your suit - I’m going to, too. My body has worked so hard for me, so this upcoming week, I’m choosing to celebrate where I am and not fret over the things I find imperfect about myself, like the little bit of extra skin above my belly button that will never seem to go away. I’m channeling pregnant Mary Catherine on vacation for the next 5 days (and maybe beyond!). ‘Cause that girl?
She didn’t give a damn.
Creating a Killer Gallery Wall
Wowowowowowowow I mean...it’s been basically a lifetime since I updated this blog. SO sorry! Not that anyone’s waiting on pins and needles, but...in case you are - sorry ‘bout that. Turns out, moving is a crazy experience and getting settled in a house with a child who decided to learn how to walk at 11 months old is QUITE a lot to juggle!
Having said that, though, we are getting settled - slowly but surely. So much of the house came together in a snap (thanks to my incredible mother and her vision for fabulousness/completely unparalleled work ethic), but there are other pieces of the puzzle that were going to take time and effort to complete.
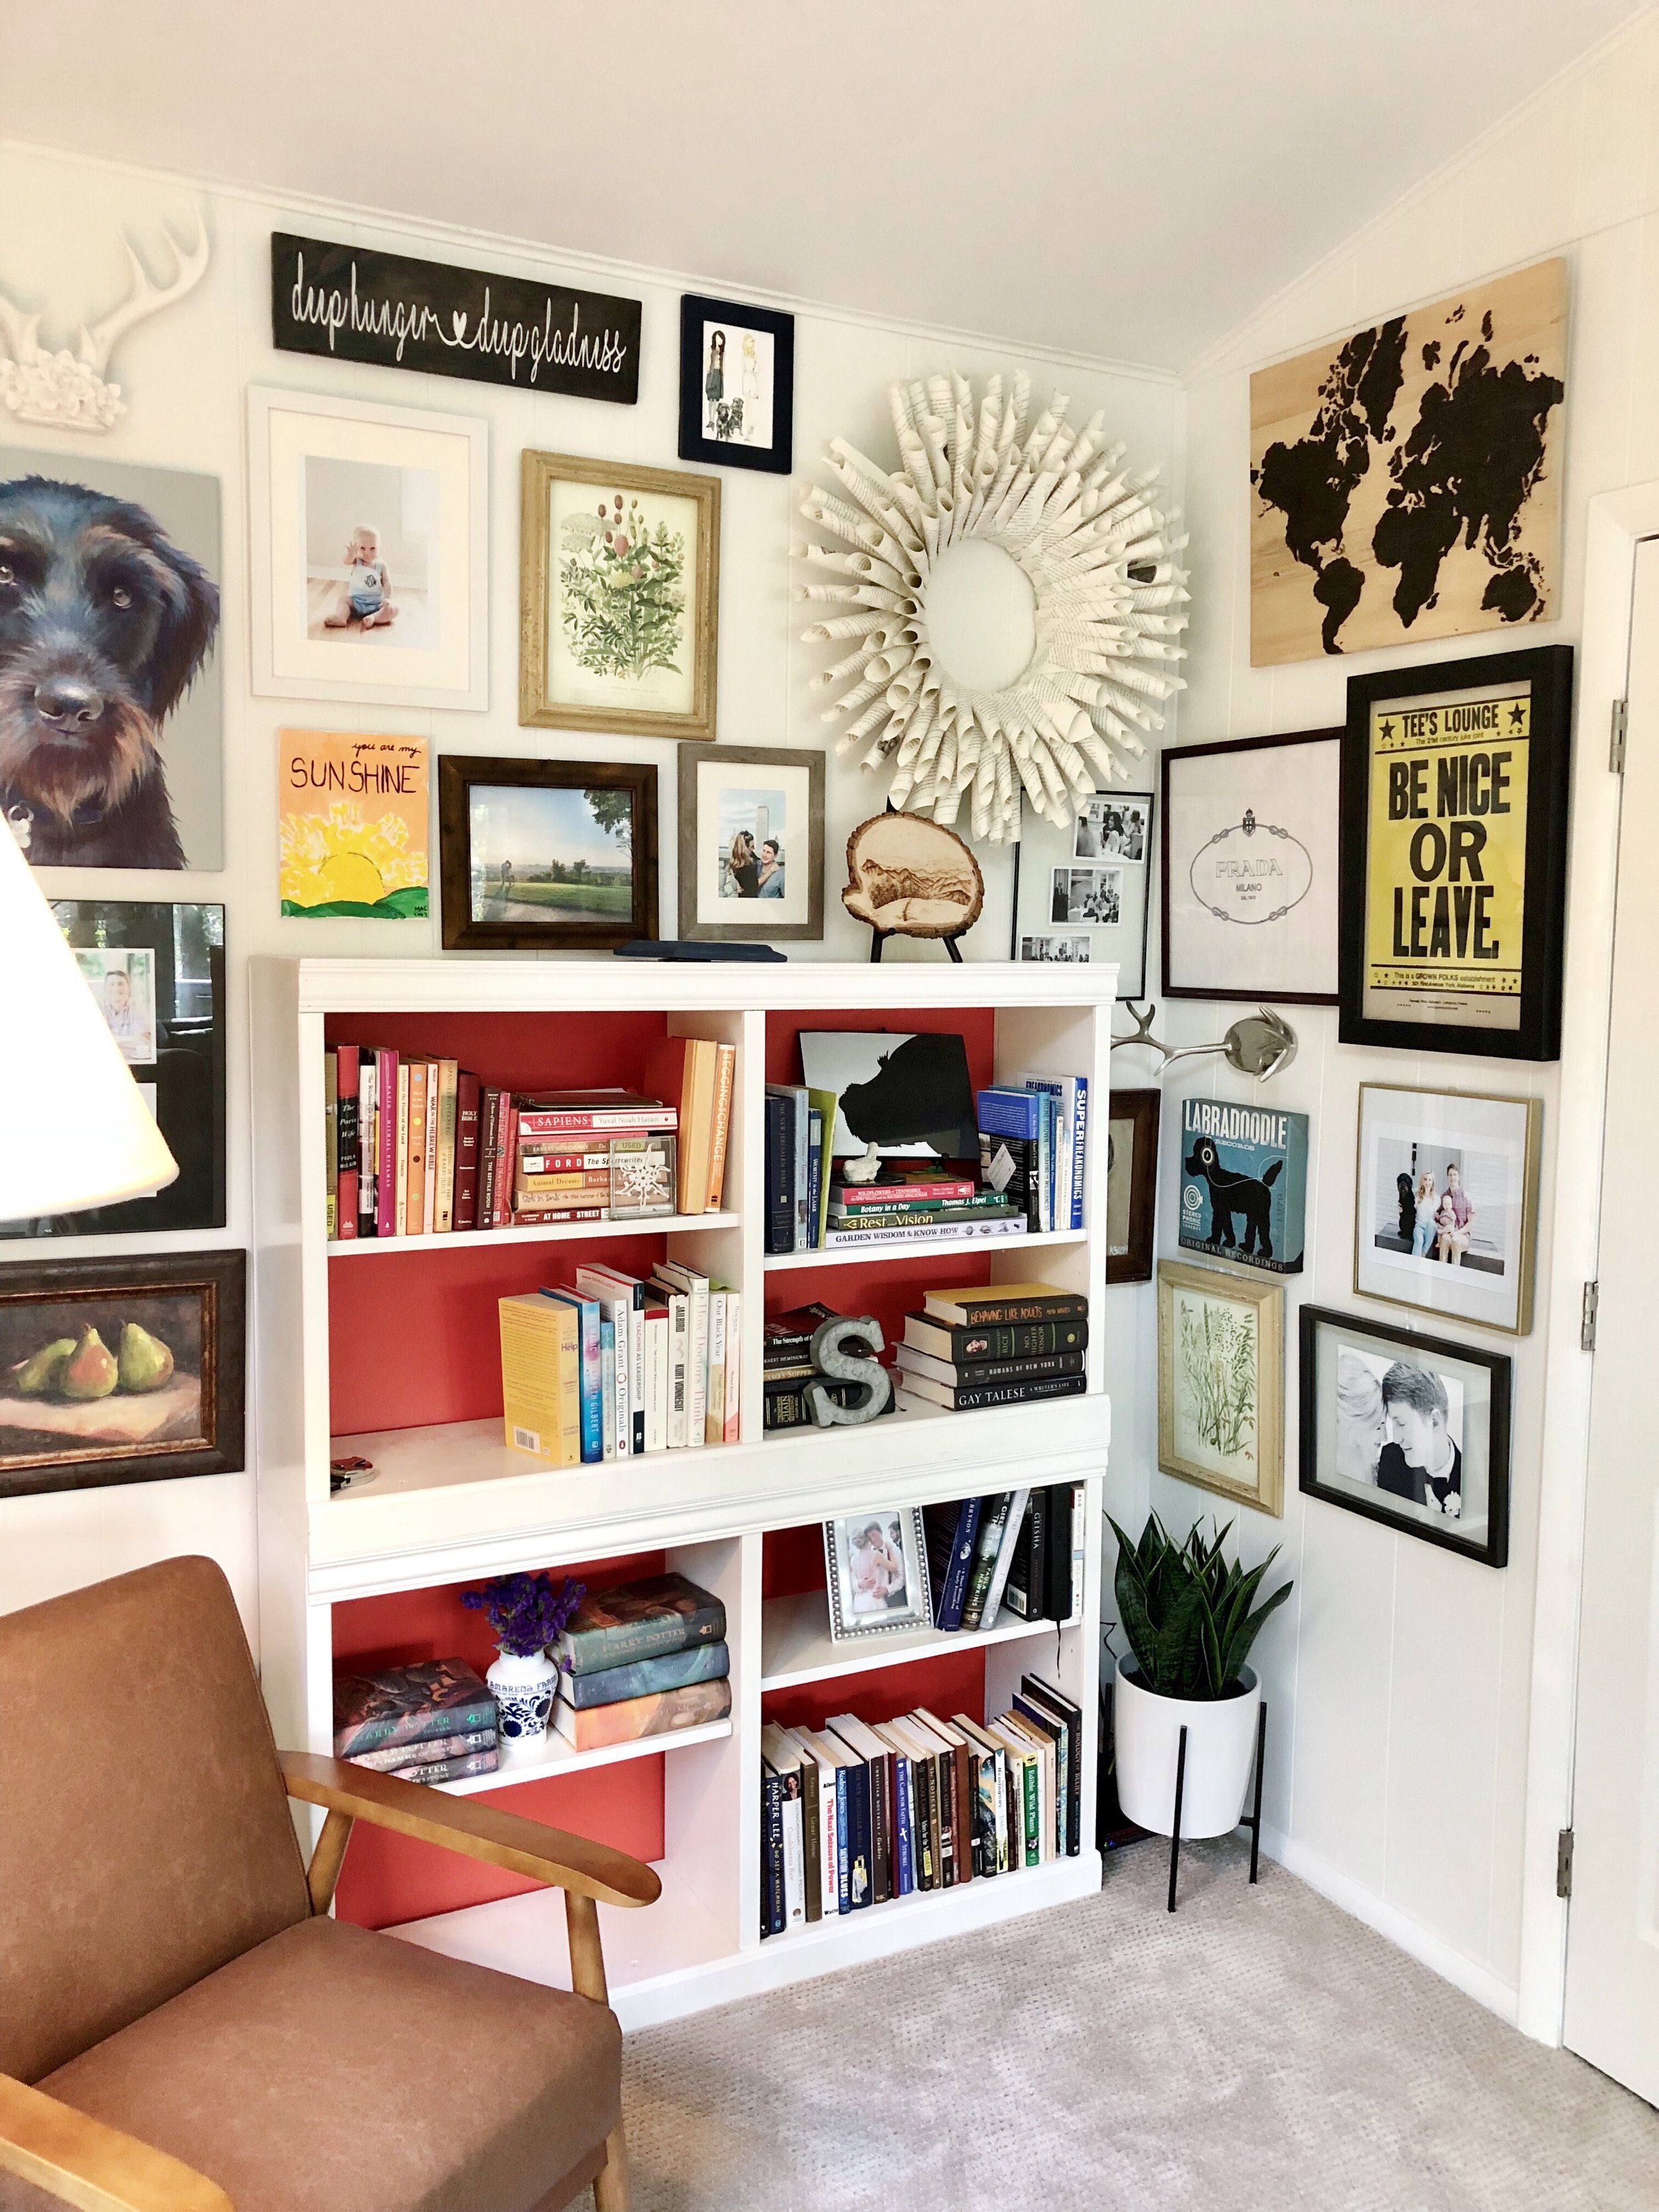
We worked hard on developing an aesthetic. Any of you who own a home know the pride that comes with decorating and styling your very first space. We painted, renovated, and got the “canvas” ready, so it was time to put some paint on that bad boy.
The house was built in 1959, so a mid-century modern vibe really fits the design of the structure itself. I wanted to keep things clean, polished, and tailored, but it was important to me to add lots of big, bold colors in each room. In our dining room, it’s the rug and our green velvet chairs. In our bar, it’s a giant painting of a big, red, cartoon apple. In the big den on the back of the house, we started with neutral colors (a grey sectional, creamy carpet, white walls), so I knew I had a real opportunity to go kind of nuts.
Enter: my favorite corner of our house. I’m calling it my Crazy Corner.
We’ve accumulated so many things over the years that are framed, and in our old house, we had several gallery walls. In this space, we had the perfect corner to incorporate ALL our framed art, and I absolutely love love LOVE how it turned out. While we used the Internet to help with a lot of other design choices, I think this particular corner fills me with pride because it is 100% my idea and execution.
I shared it on Instagram and got lots of messages asking how I chose what went where, whether I laid things out on the floor first, etc. I thought I’d offer a few tips and tricks so that you can make your own in a snap!
- Consult Pinterest. There is a huge wealth of design help there and you can find any number of templates that lay out exactly what you should do before beginning to hang things. If you’re a person who likes to lay things out first, start by measuring your space, then lay your photos out on the floor. You’ll be surprised what comfort it brings you!
- Command Strips are your friend. I couldn’t have done this without 3M Command Strips. When hanging a gallery wall, stepping back and getting perspective is a huge piece of the puzzle. When you’re up close, things look one way, but when you sit with things for a while, you realize that that one photo might need to scoot over juuuuust a tad. If you’ve nailed a hole in your wall, it gets disastrous quickly (speaking from experience here). But if you’re using a Command Strip, it’s so easy to remove it and replace it in the correct location. Game-changer.
- Take it slow. I designed this wall over the course of about a week. It was really helpful for me to take stock each night while sitting on the couch watching TV of what looked good and what needed some adjusting.
- Combine 3D elements with flat photos or framed art. One of the really fun things you can play with when putting together a gallery wall is pieces in your house you would otherwise have no place for. A giant homemade wreath made out of Harry Potter book pages? Um...the only place for that is in the good ol’ Crazy Corner. I was able to make good use of out antlers, too!
- Keep it interesting with size. Try not to hang two photos or paintings that are the same size right next to each other. I broke this rule a couple of times and I wish that I hadn’t - it looks so much better when there’s variety!
- Decide on a color scheme, or decide against one. I’ve made several gallery walls in the past that primarily featured one color or set of colors. My favorite was a neutral/blue combination I did in our old house. In this one, though, I went into it from the beginning with the intention to make it an “anything goes” sort of design. But that did mean that I had to be careful about not clumping too many browns/blacks/neutrals together without adding some color in, too. But knowing where you’re headed is essential to success, because getting halfway through and realizing you’ve used all your neutrals in one corner is a bummer.
- Watch your weight. When you’re hanging things, keep it balanced. You’ll notice in the wider shots of this space that I made sure any dark frames were spaced out and filled in with lighter frames or art to keep it from looking too heavy on one side.
- Mix it up by including paintings, drawings, words, and photos. One of my favorite things about this experience was that I got to hang all kinds of things that have meaning to our family. The “Be Nice Or Leave” print came from a juke joint in York, Alabama where I taught in Teach for America. The painting of Tom Hanks came form a dear childhood friend. Jordan’s dental school diploma is framed on the wall under the my college copy of “A Farewell To Arms,” which has my handwritten note in the margin that Hemingway re-wrote the ending to that book 33 times (a reminder to keep trying and trying!). The fork and knife painting was done by Jordan’s sister; the peony was done by my mom; the black sports car is a print from our wedding photographer. Each piece has a story attached and is up there for a reason, and every time I look at it, it feels like an artistic representation of our family.
Lastly, don’t take it too seriously! If you hang something and decide you don’t like it, don’t panic - just take it down and start again. Several folks messaged me saying they were scared to get started, but the only way to complete something like this is just to take the leap. Creating a gallery wall (especially one of this size that spans three walls floor-to-ceiling) is all about confidence and creativity. You know what you want - make it happen!
Happy hanging!
Learning to Reduce, Reuse, Recycle!
If you’re like me, you do an okay job at recycling, but not a great one. Recently, a study was released that said we pretty much have 12 years to get it together or else the world is going to explode.
(Okay, maybe that’s dramatic, but it’s not much better than that. You can read it for yourself here.)
While the majority of the change needs to come from large companies and their factories, there are simple things that you and I can do to help, too. Every tiny contribution is something!
Since moving to Asheville, I’ve gotten to encounter a lot of folks who absolutely crush the recycling game. Not only that, but they’ve found ways to lessen their environmental impact that have taught me so much! I felt a little daunted by this concept at first because I’m not someone who can, let’s say, live without central air (obviously I can, I’m being a brat) - but I’m dipping my toe into the pool and taking my transformation into Eco Girl one step at a time.
Many of you may be thinking, “Yeah, dumb dumb - we’ve been on this train for a long time. You’re not telling us anything new.” If you’re one of those people, I salute you. If you’re more like I am, here are some things I’ve recently been inspired (I polled Instagram, too - so many of your answers made it into this post!) by that have helped me feel like I’m helping, even if it seems small!
1. Wildly reducing the paper products we use.
Let’s be realistic: I have a 10-month-old and a dog. I can’t NOT have paper towels in the house. But I used to use them for everything. Are we sitting down for a meal? Tear off a paper towel to use as a napkin. Do I need something to stick my bagel on in the morning? Paper towel. Mac threw solid food all over the floor under his high chair? Paper towel.
We have cloth dish towels that we use to dry our hands off, but we were under-utilizing them. I recently bought a pack of surgical-grade towels from Amazon that are coming in so handy with all of Mac’s spills and any kitchen messes. Now, I just toss a dirty towel in the laundry rather than throwing a paper towel away. It’s been a week since I started this effort and I’ve only used 4 (!!!) paper towels! That’s an enormous difference for our family. Hoping to get down to zero!
2. No straws, napkins, or cutlery at restaurants; using glass containers to store food or reusing plastic containers from takeout.
This can be a tough one if you’re driving through because of a road trip or some other truly time-sensitive reason, but if not, it’s a great way to change your habits. I stopped using plastic straws this summer! It’s a really easy thing to refuse - I’ve started saying, “No straw, please!” And it’s as simple as that.
There are great companies that make washable metal or silicon straws, and even cutlery packets that you can take with you and re-use if you’re going somewhere that would give you plastic silverware. Easy and great! Best part - the people with whom you’re dining will also be inspired! Someone on Instagram even suggested bringing your own takeout containers to a restaurant from which you know you’ll take home leftovers. It’s brilliant!
Another great food-related suggestion I got is to buy glass containers for food storage and/or put containers you already have to use. Pay attention to which restaurants deliver food with compostable or reusable containers, and patronize their business. We vote with our dollars.
And, sadly, red meat consumption has been proven to be tough on the environment. As a non-meat-eater, this one isn’t tough for me (just another excuse not to eat tons of meat!), but it’s a great way to make a change that’s both healthy for you and the earth.
3. Keeping the AC at a reasonable temp.
It’s really tough to do this one for me because I am a SUPER WIMP about heat (that’s what growing up in Alabama will do to you. I have summer PTSD). However, I guesssssss the planet is more important than my comfort UGHGHHGHGH.
We keep our AC set to 74, although some of my friends keep theirs as high as 78 and many of my Asheville buddies don’t even have/use their AC at all. MIND BLOWING. I’m not at that level, but I can avoid cooling my house to freezing temps.
4. Buy in bulk.
This is one I haven’t started putting into practice yet, so I’m excited to try. I’m learning so much about what products are sold in “single-serving” packages that are totally unnecessary. Toothbrushes, for example. Why buy one, individually packaged toothbrush when you could buy a pack of 6 and save packaging waste?
This goes for food, too - buying in bulk at places like Costco can often save waste and save money. Items that are great bulk purchases: cereal or oatmeal; peanut butter; granola or any kind of protein/power bar; snack food like raisins, cashews, almonds; coffee, the list goes on and on. It also just occurred to me while writing this that this concept totally applies to toiletries as well!
5. Checking into what is included in curbside recycling.
Believe it or not, lots of things you’d think are recyclable aren’t actually accepted by curbside services. Plastic grocery store bags are one of those items for us! It took me many moons to realize that. I’d been putting them in the bin without knowing - now, I know that if I take them back to our local grocery store, they ensure the bags get taken to the proper facility.
Plastic bags that come from the dry cleaners are another no-no. Who knew?
6. Vote!
This might be the biggest way that we can make systemic change. We are at a point in our global society where unfortunately, small, individual actions aren’t going to be enough to change the future of our planet. Enter: people who can make a big difference.
This is a great one because it isn’t even a partisan issue! It’s based in science and data, which is a refreshing black and white in the midst of what can seem like a sea of uncertain grey. Climate change is real, global warming is real, and we need to elect leaders who both accept those facts and are ready to do something to address it. Midterms are coming - look into which candidates support saving our planet and go vote for them!
And if you need help, here is a list of folks currently serving in Congress who do not acknowledge climate change as being real. You know what to do, y’all - boot ‘em! The stakes are just too high not to.
The 7-Minute Blowout
I am so excited to share this with y'all! You know that feeling when you go to the salon, get a great blowout, and then when you try to wash your hair and recreate it, you're defeated and also kind of haggard?
ME TOO, GIRL.
This blowout has given me L I F E since I mastered the technique. Together with OI All In One Milk, this method of drying my hair has not only saved me so much time, but has also given me a shiny, touchable blowout that lasts for days. I can't say enough good things about it. Even if you have super thick hair, this should work! It might be a ten minute blowout for you super-thick-haired girls. Hehe!
All you'll need is a hairdryer with a nozzle, a paddle brush, a volumizing spray or mousse, and a pre-treatment like OI's All In One Milk (which I use in this video).
I hope this saves you time so you can get to the business of being awesome!
Pin Curls that Last for 5 Days
Hey, friends!
So one of the big resolutions I made to myself when I started this blog a few years ago was that I didn’t want to be a fashion/beauty/lifestyle blogger. Today, I’m breaking that promise to bring you something that I believe is pretty freakin’ worthwhile: the 5-day hairstyle.
You heard right: style once, wear for 5 days. Don’t believe me? Check it out.
This little trick has helped me enormously since I had a baby, though I figured it out long before Mac was born. I was always a person who said, “My hair won’t hold curl.” It turns out that’s a bunch of hooey. ANYONE’S hair can hold curl - even the most limp, flat, fine, straight hair. Trust.
So this process is called “pin curling,” and it’s a really old technique. The science behind it is that if you allow your hair to cool while it’s still in the shape of a curl, it retains the shape for a lot longer. Think about it: if you curl your hair with a curling iron, then immediately let it drop back down as it cools, the curl will be a lot looser because it’s cooling in a more open, wider shape, instead of in a tightly-wound curl.
It’s a little bit of work on the front end, but it takes no more than twenty minutes. And when you’re through, you have 5-day hair - 20 minutes for 5 days? Worth it.
You’ll need:
- Clean hair
- Duck clips (the long, silver clips you see at the salon)
- A 1’’ curling iron (if yours is a little larger or smaller, that’s fine - we’ll get to how you can make that work)
- L'Oreal TXT It Tousle Wave Spray (optional, but great)
- 20 minutes
Step One:
Wash, dry, and blow your hair out. A “blowout” doesn’t need to be salon-quality - it just needs to straighten your hair and get it completely dry. I divide my hair into two sections with a large clip, dry the bottom half with a paddle brush, then dry the top half with a round brush, pulling the brush up and through my hair as I dry it to give it some volume around the crown. Whatever method works for you is fine - just needs to get the job done.
Step Two:
Grab a two-inch section of hair and use your curling iron to curl it under, all the way toward your scalp. The direction you curl it is up to you - if you want to have a salon blowout look, curl it under. If you’re going for more of a Victoria’s Secret wave, curl the hair around the closed barrel of your curling iron. That’ll make more sense in the video below.
Step Three:
Release the hair from the curling iron. Then, using two fingers on your non-dominant hand, curl the section of hair around your fingers back up in the same direction as before, and secure it with a duck clip. Make sure the curve of the clip is facing toward your scalp, not away. If it sounds confusing, use the video tutorial below as a guide.
Step Four:
Repeat the process until your whole head is covered in pins.
Step Five:
Give your hair some time to set. Do some housework, make some phone calls, or if you’re doing it in the morning before work, make this the first step in your routine. Do your makeup and have your coffee while your hair cools!
Step Six:
Take your hair down and comb through it with a wide-toothed comb. Don’t worry - this step isn’t going to destroy your curls. It’s just going to calm them down. Make sure you complete this step with at least ten minutes before you need to be anywhere so that your hair has time to settle and you don’t look like you shoved your finger in a light socket, like so:
To maintain your curls all week long:
Before bed each night, wrap your hair into a twisted bun and secure it with a rubber band. I usually loop one loop all the way around the hair, and take the other loop halfway over the bun to make sure it stays in place all night (watch the video below for a detailed walk-through).
In the morning, take your hair down and you’ll discover that you’ve still got an “out in public” ready head of hair. Hooray!
Just to show you that this works, I documented 5 days’ worth of hair for you. I curled it on a Thursday, and the last photo was taken on a Monday.
Thursday:
Friday (yes, I’m wearing the same shirt, I have a newborn, don’t judge me):
Saturday (featuring my goofy husband):
Sunday:
Monday (the messiest and yuckiest day):
As they say in My Big Fat Greek Wedding: "So there you go!"
I hope this has been helpful and will save you some time in the mornings that you could use snuggling your babies, sleeping in, or getting extra work done.
Thus endeth my stint as a fashion blogger.
*Bows*